NFTs are rapidly becoming incredibly popular, both among users of crypto, as well as among people who do not otherwise own crypto. We have written this guide to explain to you the basics of what an NFT is. If you are looking for how to import NFT activity into Ledgible Crypto Tax Software, click here.
NFT stands for Non-Fungible Token. That means that a token is unique and is not, or can not be, replicated. Cryptocurrency tokens, such as bitcoin, are Fungible, meaning there can be multiple bitcoin tokens with identical properties.
What makes an NFT is the token being backed by the blockchain and being able to track all transactions that have occurred with the token and who owns or owned the token at any point in time.
At this current point in time, the most popular use of NFTs is images and gifs as NFTs. However, technically anything that exists digitally can be turned into an NFT, such as videos, documents, web domains, and much more.
NFTs can sell for very high value, so many use them as a vehicle for investment. However, just like any investment (especially crypto) they can be very volatile and their value can decrease just as easily (maybe even easier) as it can go up. Many people also just enjoy collecting NFTs and having the status of being the sole owner of the image, gif, document, or other digital item.
For these investments, it's important that you have a proper NFT tax software to handle your capital gains and losses - and effectively manage your investments come tax time. For the rest of the article, we'll walk through the various ways in which Ledgible Crypto Tax Software can handle NFTs and help you in the process of filing your taxes.
Syncing NFT Transactions with Ledgible Tax
NFTs (Non-Fungible Tokens) are a non-interchangeable unit of data stored on a blockchain. This data could be associated with photo, video or audio. NFT tracking isn’t done automatically on Ledgible, so tracking the activity will be best done manually.
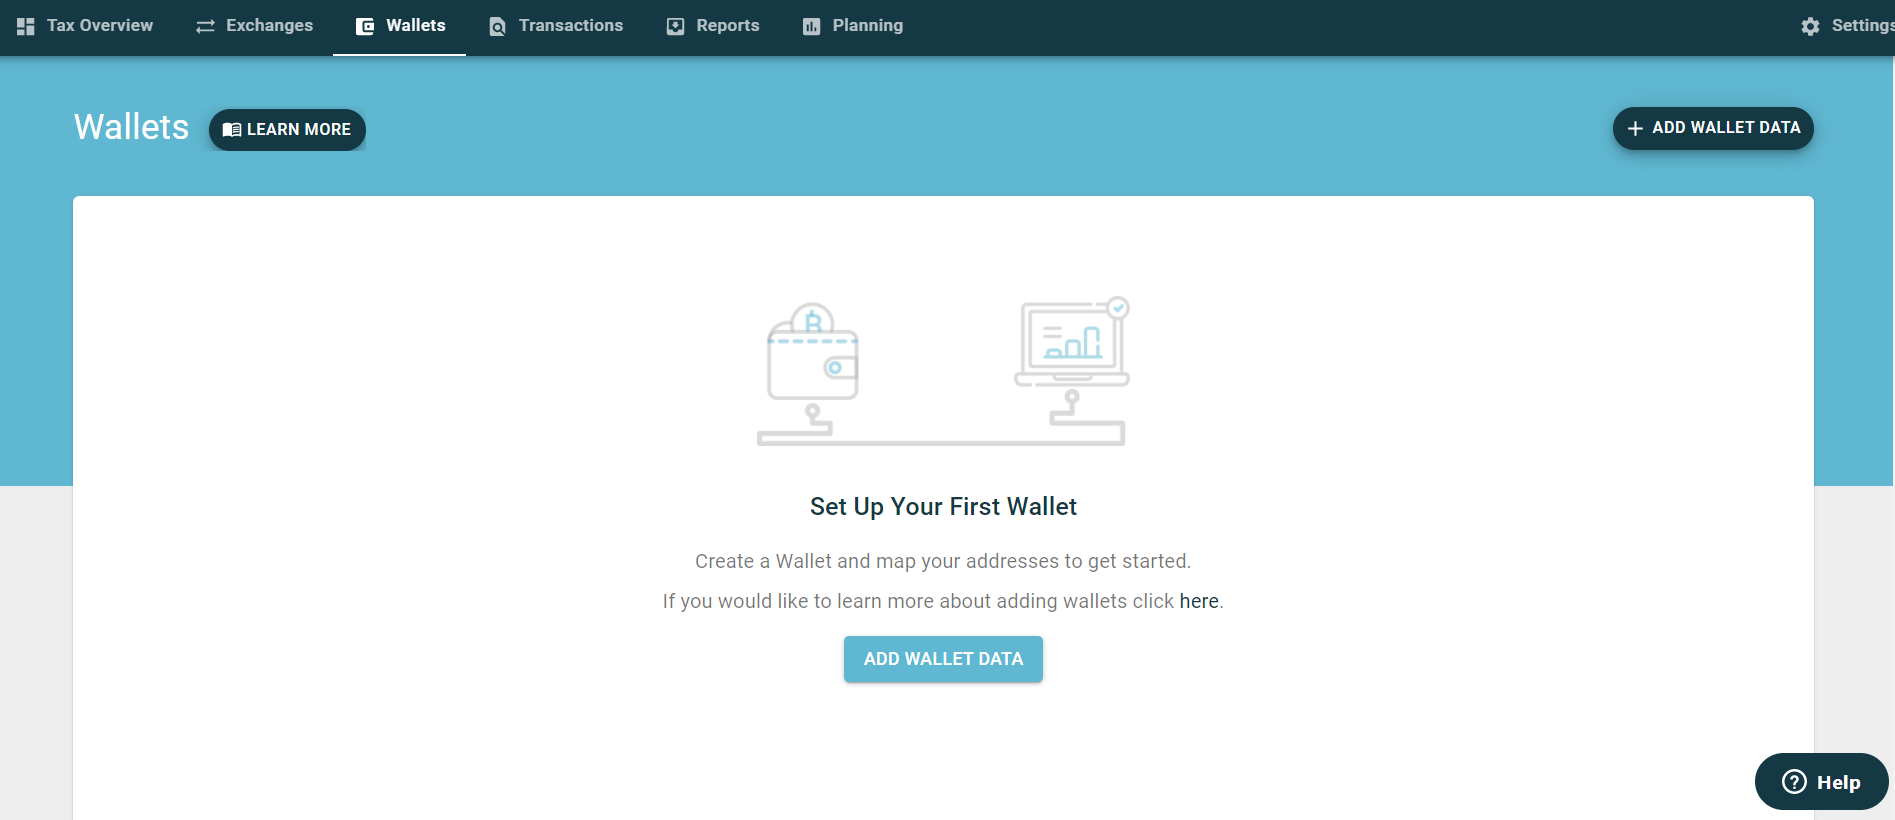
You can start by going to the wallets tab:
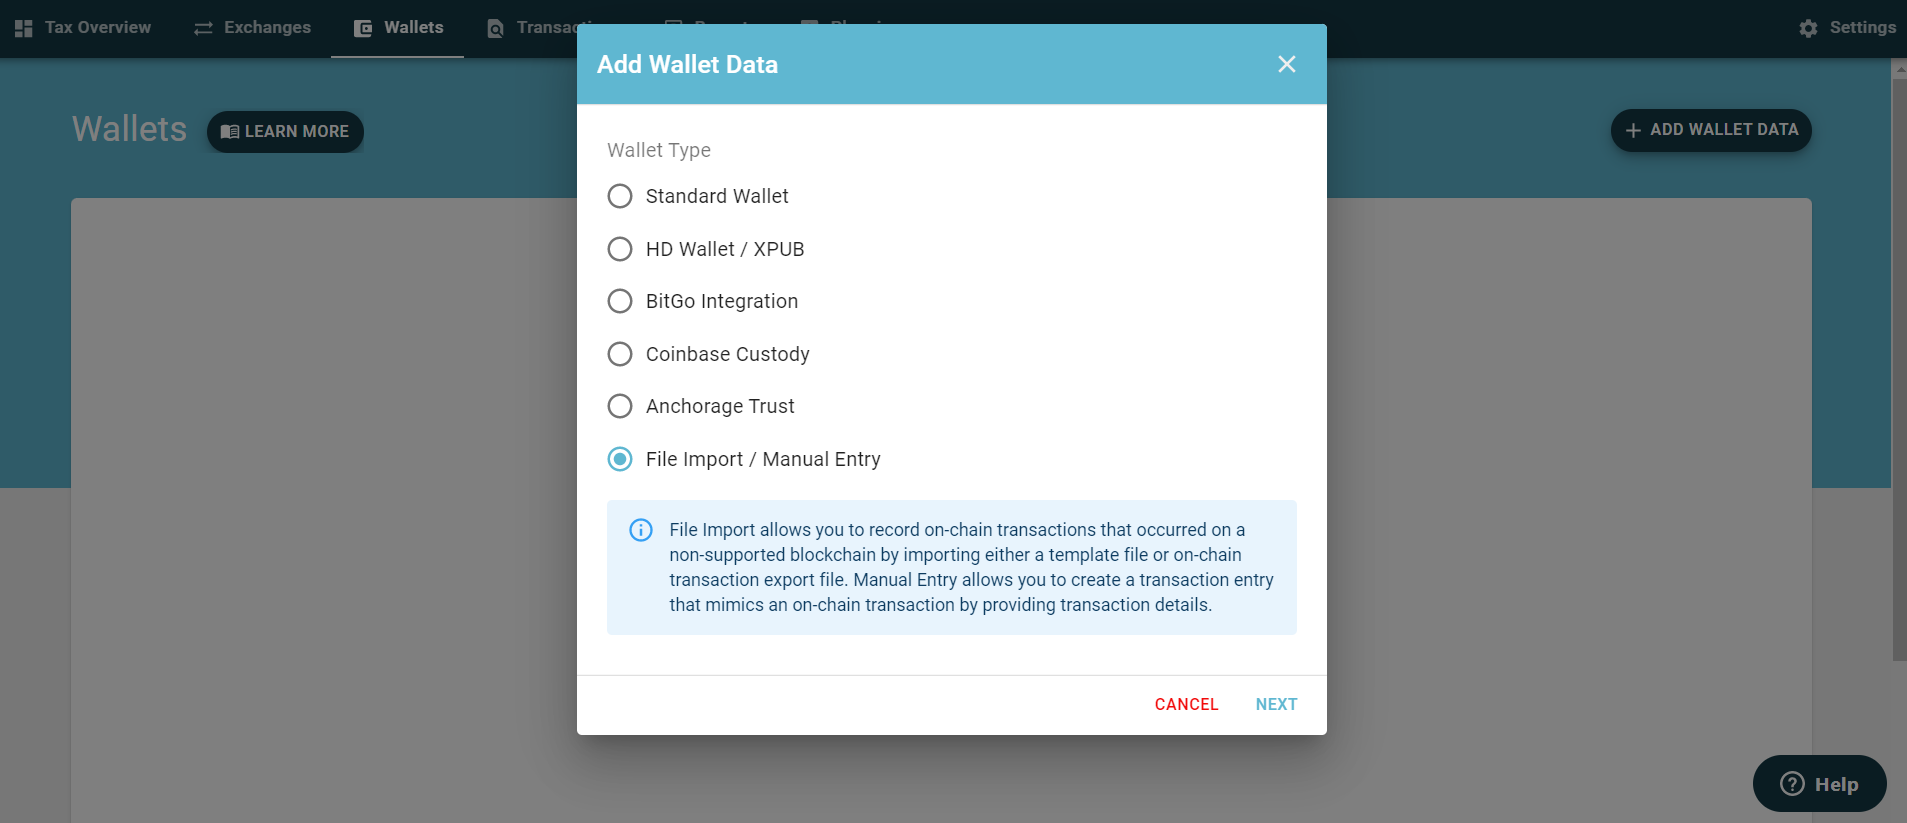
Next click Add Wallet Data and select File Import/Manual Entry and click Next
In addition to manually uploading entries, you are able to download our template and import entries using our file template import:

In the below example, we will go through the manual entry method for minting an NFT. Name your wallet, select NFT and you will have a choice of downloading our file import for many transactions or Manual Entry; we will start with Manual Entry.
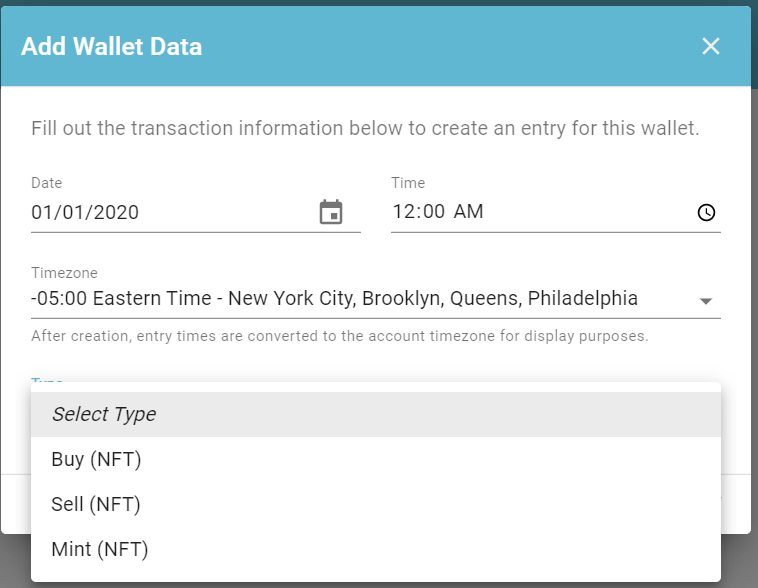
You will have the ability to choose if you are buying, selling or minting an NFT.
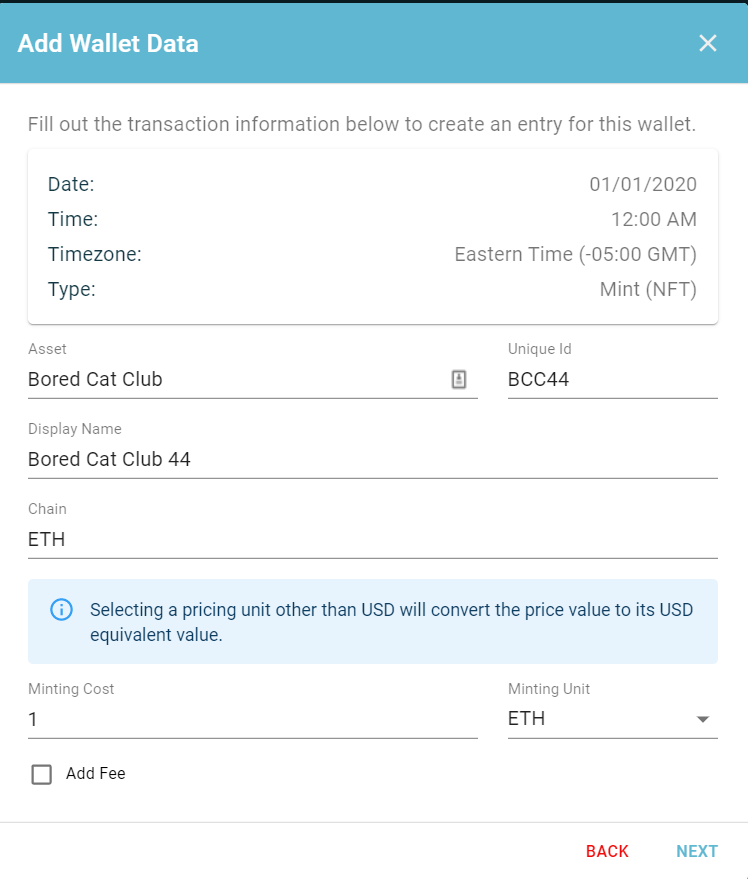
We will go to the next step - in this example I have an asset called "Bored Cat Club" and I have number 44 in the series. It cost me 1 ETH to mint and I had no fees for Minting. If you have fees, you can select and add by clicking on 'Add Fee'.
Finally, click next and create the NFT entry.
To review or add additional entries, select the wallet you just named and click the imports tab.

Syncing Ledgible with Exodus for NFTs

Ledgible fully supports Exodus (and all cryptocurrency wallets and services) today - any transaction activity involving it can be imported via our standard wallet or HD/XPUB options for transactions on natively-supported chains, or if on a different chain through the file import wizard or manual entry feature. The only caveat is that for data sources added by file import or manual entry the transaction activity will not automatically update in Ledgible.
Standard Wallet
For natively-supported blockchains, you can simply add your wallet's receiving address(es) to Ledgible and Ledgible will automatically find and add all past and future transactions associated with that address. See our article on the standard wallet option for detailed steps. The list of supported chains can be accessed by selecting this method when adding your wallet data from the Wallets tab.
See the following resource from Exodus for locating the address(es) associated with your wallet:
https://support.exodus.com/article/702-how-do-i-export-a-list-of-my-wallet-addresses
HD/XPUB
For chains that support Hierarchical Deterministic (HD) wallets, you can add your XPUB (Extended Public Key) to Ledgible, which will allow Ledgible to access the receiving addresses associated with your wallet and use that information to automatically add all associated historical and future transactions. This method supports both single and multisig (multi-signature) wallets.
See the following resource from Exodus for instructions on obtaining your XPUB:
https://support.exodus.com/article/112-how-to-export-your-xpub-or-zpub-key
Once you have your XPUB, you can add your XPUB to Ledgible from the Wallets tab by selecting Add Wallet Data and then the HD Wallet / XPUB option. See the following Knowledge Base article for detailed steps:
Creating a Wallet if you have an XPUB, YPUB, ZPUB (HD Key) or an HD Multi-signature Wallet
File Import
Obtaining Your Transaction History File
If you opt to use the file import option, you will first need to obtain a file containing your transaction history. Here is a link to Exodus Wallet's support website that contains instructions on how to download the transaction history into a file:
https://support.exodus.com/article/77-how-do-i-export-my-transaction-history
You can either download all cryptocurrency transactions into one file to be added to one wallet in Ledgible, or download the transaction history for each cryptocurrency that you have transacted in and add each chain from your Exodus wallet separately.
Be sure to export your full transaction history so Ledgible performs calculations correctly. Please note that the File Import option is limited to importing a file with up to 500 transactions at a time, so if you have more than 500 transactions you may want to break your file into multiple sections.
Adding Your Transactions to Ledgible
- Once you have your transaction history file, open the File Import Wizard by clicking the Add Wallet Data button from the Wallets tab, select the File Import / Manual Entry option and then Next.
- Select Standard (default) if you do not have any DeFi transactions. Select DeFi Activity if you have engaged in DeFi activity such as swaps, staking or liquidity pools. Leave the File Import option selected.
- Select Next to download the template file using the Template button and upload your edited template file using the Import Data button. The template file contains detailed instructions and examples on how to format your data correctly. We highly recommend downloading the template file, copying the relevant columns from your transaction history file and pasting them in the appropriate columns in the Template file, then uploading the completed file from this screen. This will ensure that the required columns are included in your upload and simplify the mapping process.Please note: Ledgible expects different fields for each type of file import depending if you are adding your data from a Wallet (Standard, DeFi Activity or NFT) or Exchange.
- Click Next to proceed to the File Import Wizard, which will guide you through mapping the columns in your uploaded file to the fields in Ledgible and reviewing the data for errors prior to upload.
- Please note that you will need to add future transaction history for this wallet by exporting your Exodus transaction history beginning with the time the original transaction history file ended. Select this wallet from the Wallets tab, then click the Import Entries button to import your file using the same method.
Manual Entry
You can add transactions one at a time by adding the relevant data to Ledgible manually. This is only recommended if you have a few transactions.
- First, create a new wallet from the Wallets tab by clicking the Add Wallet Data button.
- Select the File Import / Manual Entry option and then Next.
- Give your wallet a name and select the type of entry you would like to add (Standard, DeFi Activity, or NFT).
- Select Manual Entry and then Next.
- Add the Date, Time, Time Zone, and Type of transaction. The Categorization field is optional. Click Next.
- Add the Currency Symbol and Quantity of this transaction. Select Spot Pricing to have Ledgible lookup the price at the approximate time of the transaction or Custom Pricing to add your own pricing data. Check Add Fee if you would like to add fee data to this transaction using the Fee and Fee Currency fields. Click Next.
- Review your transaction data to ensure it is correct and then click the Create button to add this transaction to Ledgible.
- Select Close if you are done adding transactions or View Wallet to review this wallet and add more transactions.
- To add more transactions to this wallet, simply click the Create Entry button. You can also access this by selecting the wallet in the Wallets tab. Please note that you will need to add future transaction history for this wallet manually.
Syncing Ledgible with Abra for NFTs

Ledgible fully supports Abra (and all cryptocurrency wallets and services) today - any transaction activity involving it can be imported via our standard wallet option for transactions on natively-supported chains, or if on a different chain through the file import wizard or manual entry feature. The only caveat is that for data sources added by file import or manual entry the transaction activity will not automatically update in Ledgible.
Standard Wallet
For natively-supported blockchains, you can simply add your wallet's receiving address(es) to Ledgible and Ledgible will automatically find and add all past and future transactions associated with that address. See our article on the standard wallet option for detailed steps. The list of supported chains can be accessed by selecting this method when adding your wallet data from the Wallets tab.
You can locate your wallet's receiving address by completing the following steps:
- In your Abra app go your Trading account.
- Select +Add Money.
- Select Deposit Cryptocurrency.
- Agree to the terms.
- Select the desired cryptocurrency (ex: Bitcoin)
- Copy your receiving address.
File Import
Obtaining Your Transaction History File
If you opt to use the file import option, you will first need to obtain a file containing your transaction history. Here is a link to Abra's support website that contains instructions on how to download the transaction history into a file.
Be sure to export your full transaction history so Ledgible performs calculations correctly. Abra limits the transaction history to one year at a time, so be sure to export each year in which you had transactions in your Abra wallet. Please note that the File Import option is limited to importing a file with up to 500 transactions at a time, so if you have more than 500 transactions you may want to break your file into multiple sections.
Adding Your Transactions to Ledgible
- Once you have your transaction history file, open the File Import Wizard by clicking the Add Wallet Data button from the Wallets tab, select the File Import / Manual Entry option and then Next.
- Select Standard (default) if you do not have any DeFi transactions. Select DeFi Activity if you have engaged in DeFi activity such as swaps, staking or liquidity pools. Leave the File Import option selected.
- Select Next to download the template file using the Template button and upload your edited template file using the Import Data button. The template file contains detailed instructions and examples on how to format your data correctly. We highly recommend downloading the template file, copying the relevant columns from your transaction history file and pasting them in the appropriate columns in the Template file, then uploading the completed file from this screen. This will ensure that the required columns are included in your upload and simplify the mapping process.Please note: Ledgible expects different fields for each type of file import depending if you are adding your data from a Wallet (Standard, DeFi Activity or NFT) or Exchange.
- Click Next to proceed to the File Import Wizard, which will guide you through mapping the columns in your uploaded file to the fields in Ledgible and reviewing the data for errors prior to upload.
- Please note that you will need to add future transaction history for this wallet by exporting your Abra transaction history beginning with the time the original transaction history file ended. This might mean that you need to download this year after the year ends and remove the transactions in the file that you have already added prior to upload. You can delete any duplicates if you accidentally add them from the Wallets tab. Select this wallet from the Wallets tab, then click the Import Entries button to import your file using the same method.
Manual Entry
You can add transactions one at a time by adding the relevant data to Ledgible manually. This is only recommended if you have a few transactions.
- First, create a new wallet from the Wallets tab by clicking the Add Wallet Data button.
- Select the File Import / Manual Entry option and then Next.
- Give your wallet a name and select the type of entry you would like to add (Standard, DeFi Activity, or NFT).
- Select Manual Entry and then Next.
- Add the Date, Time, Time Zone, and Type of transaction. The Categorization field is optional. Click Next.
- Add the Currency Symbol and Quantity of this transaction. Select Spot Pricing to have Ledgible lookup the price at the approximate time of the transaction or Custom Pricing to add your own pricing data. Check Add Fee if you would like to add fee data to this transaction using the Fee and Fee Currency fields. Click Next.
- Review your transaction data to ensure it is correct and then click the Create button to add this transaction to Ledgible.
- Select Close if you are done adding transactions or View Wallet to review this wallet and add more transactions.
- To add more transactions to this wallet, simply click the Create Entry button. You can also access this by selecting the wallet in the Wallets tab. Please note that you will need to add future transaction history for this wallet manually.
If you need more information on NFT Taxes and NFT Tax Software, you can learn more on our crypto Knowledge Base here.